



Step by Step Guide to Performing Abhaya Mudra
Step by Step Guide to Performing Abhaya Mudra
Table of Contents
- What Is the Abhaya Mudra and Why It Matters
- Step by Step Guide to Performing Abhaya Mudra
- Anatomical Alignment and Body Awareness Tips
- Benefits of Abhaya Mudra for Mind and Body
- Abhaya Mudra Meditation Techniques and Breathwork
- How to Practice Mudras for Beginners
- Common Mistakes and Precautions
- Conclusion
- Frequently Asked Questions
Last Updated: September 24, 2026
What Is the Abhaya Mudra and Why It Matters
The Abhaya Mudra is a hand gesture in which the right hand is raised to shoulder height with the palm facing outward and the fingers extended upward. In Buddhist and Hindu traditions, this gesture signals protection, fearlessness, and inner peace. This guide from HD Asian Art walks through the full practice, from posture to breathwork.
The gesture appears across centuries of Buddhist art and Hindu sculpture. You will see it carved into stone Buddhas and cast in bronze figures from across Asia. Each one holds the same open palm, a quiet message of safety.
Why does a hand position matter so much? Because the body teaches the mind. When you hold your palm outward, you signal calm to your own nervous system. Many practitioners find that this simple gesture settles racing thoughts within a few minutes.
The benefits of Abhaya Mudra go beyond symbolism. The pose supports emotional stability, focus, and a sense of grounding during meditation. It also pairs well with any seated practice you already use.
Below, we break down the exact steps, the anatomy to watch, and the breathwork that makes the gesture work.
Step by Step Guide to Performing Abhaya Mudra
Performing the Abhaya Mudra takes about two minutes to set up. The steps below cover posture, hand placement, and breath so you can build the full practice in one sitting.
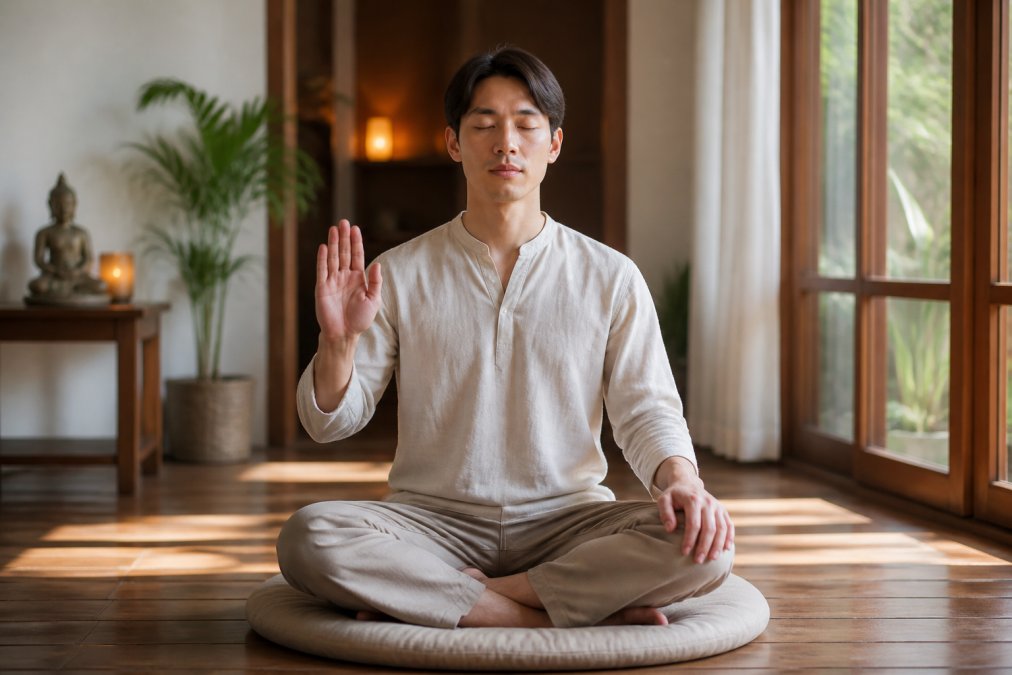
Position Your Seated Posture
Sit in a comfortable seated position. A cushion, chair, or folded blanket all work. Keep your spine tall but not stiff.
Rest your left hand on your knee or lap, palm up. Let your shoulders drop away from your ears. Close your eyes or soften your gaze downward.
Align Your Hand and Elbow
Raise your right hand to shoulder height. Turn the palm outward, away from your body. Keep the fingers extended and close together, pointing up.
The elbow should stay bent at roughly a right angle. Many people let the elbow drift out to the side. Keep it tucked near your ribs instead.
Coordinate Breath and Gaze
Breathe in slowly through your nose. As you exhale, feel the palm press gently forward, as if you were steadying someone.
| Step | Action | Time | Frequency |
|---|---|---|---|
| Posture | Sit tall, left hand on lap | 1 min | Every session |
| Hand placement | Right palm out at shoulder height | 30 sec | Every session |
| Breath and gaze | 5-10 slow breaths per round | 3-5 min | 2-3 rounds daily |
Anatomical Alignment and Body Awareness Tips
Most guides skip the anatomy, and that is where the practice falls apart. A raised arm held badly will ache within minutes. Good alignment lets you hold the gesture for twenty minutes or more.
Benefits of Abhaya Mudra for Mind and Body
The benefits of Abhaya Mudra show up in two places: the mind and the body. Practitioners often describe a settling effect, a slower pulse, and steadier emotions after a short session.
- Supports a calmer, steadier mood
- Encourages slow, even breathing
- Builds focus and concentration
- Promotes grounding during seated practice
- Fits easily into an existing meditation routine
Abhaya Mudra Meditation Techniques and Breathwork
Pairing the gesture with breathwork deepens the effect. In yogic practice, breath carries prana, the subtle energy that moves through the body. The hand position and the breath work together: the open palm sets the intention, and the breath paces it.
Three Breath Patterns to Try
Start with the first pattern and only move on when it feels effortless for a full round.
- Even count (4-4). Inhale through the nose for a count of four. Exhale through the nose for a count of four. Keep the palm facing outward the whole time. This is the steadiest starting point and the easiest to hold for long sessions.
- Extended exhale (4-2-6). Inhale for four, hold gently for two, exhale for six. The longer exhale is the active ingredient. Skip the hold entirely if you are pregnant, have a heart condition, or feel lightheaded, go straight from inhale to exhale.
- Box breathing (4-4-4-4). Inhale for four, hold for four, exhale for four, hold for four. This pattern suits practitioners who want a focus-forward session rather than a calming one.
A Structured Session You Can Follow
Most guides never say how long to hold the gesture. Here is a progression that works.
- Settle (1 minute). Sit tall, left hand on your lap, right palm raised at shoulder height. Let the breath find its own rhythm before you count anything.
- First round (3 minutes). Use the even count. Keep the palm steady. If the arm tires, rest the elbow lightly against your ribs.
- Rest (30 seconds). Lower the arm. Shake out the wrist and roll the shoulder once.
- Second round (3 minutes). Move to the extended exhale if the first round felt easy.
- Close (1 minute). Lower the hand, rest both palms on your knees, and sit with the after-effect before you open your eyes.
Breath and Body Scan
For a longer session, layer a body scan on top of the breath. Move your attention from your feet to your head while holding the gesture, and notice where you carry tension. The jaw, the brow, and the raised shoulder are the usual culprits. Soften each one as you pass it. Return to the palm whenever your attention drifts, the open hand is the anchor, the breath is the pace, and the scan is the cleanup.
How to Practice Mudras for Beginners
Learning how to practice mudras for beginners comes down to three habits: short sessions, a fixed time, and a quiet environment. The rest is repetition.
A Four-Week Starting Schedule
Most guides tell you to "practice daily" and stop there. A concrete schedule removes the guesswork.
| Week | Session length | Rounds | Focus |
|---|---|---|---|
| 1 | 5 minutes | 1 | Posture and hand shape only |
| 2 | 8 minutes | 2 | Adding the even breath count |
| 3 | 10 minutes | 2 | Extended exhale on round two |
| 4 | 12 minutes | 3 | Full session with body scan |
Setting Up the Habit
- Pick a time you can keep. Morning works well for many people because the house is quiet and the day has not started competing for attention.
- Sit in the same spot each day so the practice becomes automatic. The brain links the location to the behavior faster than you would expect.
- Choose one mudra and stay with it for two weeks before adding another. Switching gestures every day slows the learning curve.
- Use a timer so you are not checking the clock. A phone timer face-down on the floor works fine.
- Note how you feel after each session, one line in a notebook is enough. Patterns show up within two weeks.
What to Expect in the First Month
The first few sessions often feel mechanical. The hand goes up, the breath counts, the timer ends. That is normal. Most practitioners find the gesture starts to carry its own weight somewhere in the second or third week, when the palm goes up and the body settles before the first count. If that does not happen by week four, shorten the session rather than pushing through, a shorter practice you repeat is what builds the association.
Common Mistakes and Precautions
The most common mistake is forcing the pose. A rigid hand and locked elbow create strain fast. Keep the gesture firm but soft.
Watch for these issues:
- Raising the arm above shoulder height, which strains the neck
- Letting the elbow drift out to the side
- Gripping the fingers instead of extending them
- Practicing right after a heavy meal
- Ignoring pain in the shoulder or wrist
Conclusion
Building a steady Abhaya Mudra practice takes patience, and the payoff is a calmer, more grounded daily life. A quiet corner, a cushion, and a few minutes each morning are enough to begin.
Frequently Asked Questions
How do you perform Abhaya Mudra correctly?
Sit in a comfortable seated position with your spine straight. Raise your right hand to shoulder height, palm facing outward, fingers extended and together. Keep your elbow slightly bent and relaxed, not locked. Rest your left hand on your lap. Breathe slowly and hold the gesture for 5 to 15 minutes. This step by step guide to performing abhaya mudra helps you build a steady, grounded practice.
Which hand is used for Abhaya Mudra?
The right hand is traditionally used for Abhaya Mudra, raised at shoulder height with the palm facing outward. In some Buddhist and Hindu iconography, both hands may form the gesture, but for personal practice the right hand is standard. If your right shoulder feels strained, you can alternate or use both hands, keeping elbows relaxed and fingers extended.
What are the primary benefits of practicing Abhaya Mudra?
Practitioners report reduced stress, greater emotional stability, and a sense of inner peace. The gesture supports concentration during meditation and may help calm the nervous system. Many use it to cultivate courage and fearlessness before difficult conversations or decisions. As part of a regular yoga mudras routine, it can deepen mindfulness and body awareness.
Can Abhaya Mudra be practiced during meditation?
Yes, it is often used during meditation. Hold the hand position at shoulder height with palm facing outward while you focus on your breath. Start with 5 minutes and gradually extend to 15 or 20 minutes. Combine it with slow, even breathing to support concentration. This abhaya mudra meditation technique is suitable for beginners and experienced practitioners alike.
